Jekyll Site Hosted on AWS S3 Using GitHub Actions

Hi there, I'm a prior hybrid network engineer transformed cloud engineer, and I enjoy writing posts about my technical journey including implementation guides, insights, tips, scripts and graphics from what I've gleaned along the way.
This article was originally published in July 2021 on my GitHub io blog here
Overview
The purpose of this runbook is to define the steps needed to deploy a secure static website hosted on an AWS S3 Bucket served by an AWS CloudFront Distribution (CDN) with automated deployment of updates using a GitHub Actions Workflow.
Our use case for this runbook will be following the build of my personal resume website: jennasprattler.com | www.jennasprattler.com
Pre-requisites
Static website
For ideas, there's a curated directory of Jekyll Themes
I'm using this Jekyll theme for my website: modern-resume-theme
GitHub Account and Repo
- To store your website files and run GitHub Actions Workflows
AWS Account
- To implement Route 53 DNS records, S3 Bucket storage, CloudFront CDN and AWS Certificate Manager for SSL Certificates
High-level Overview - Traffic Flow
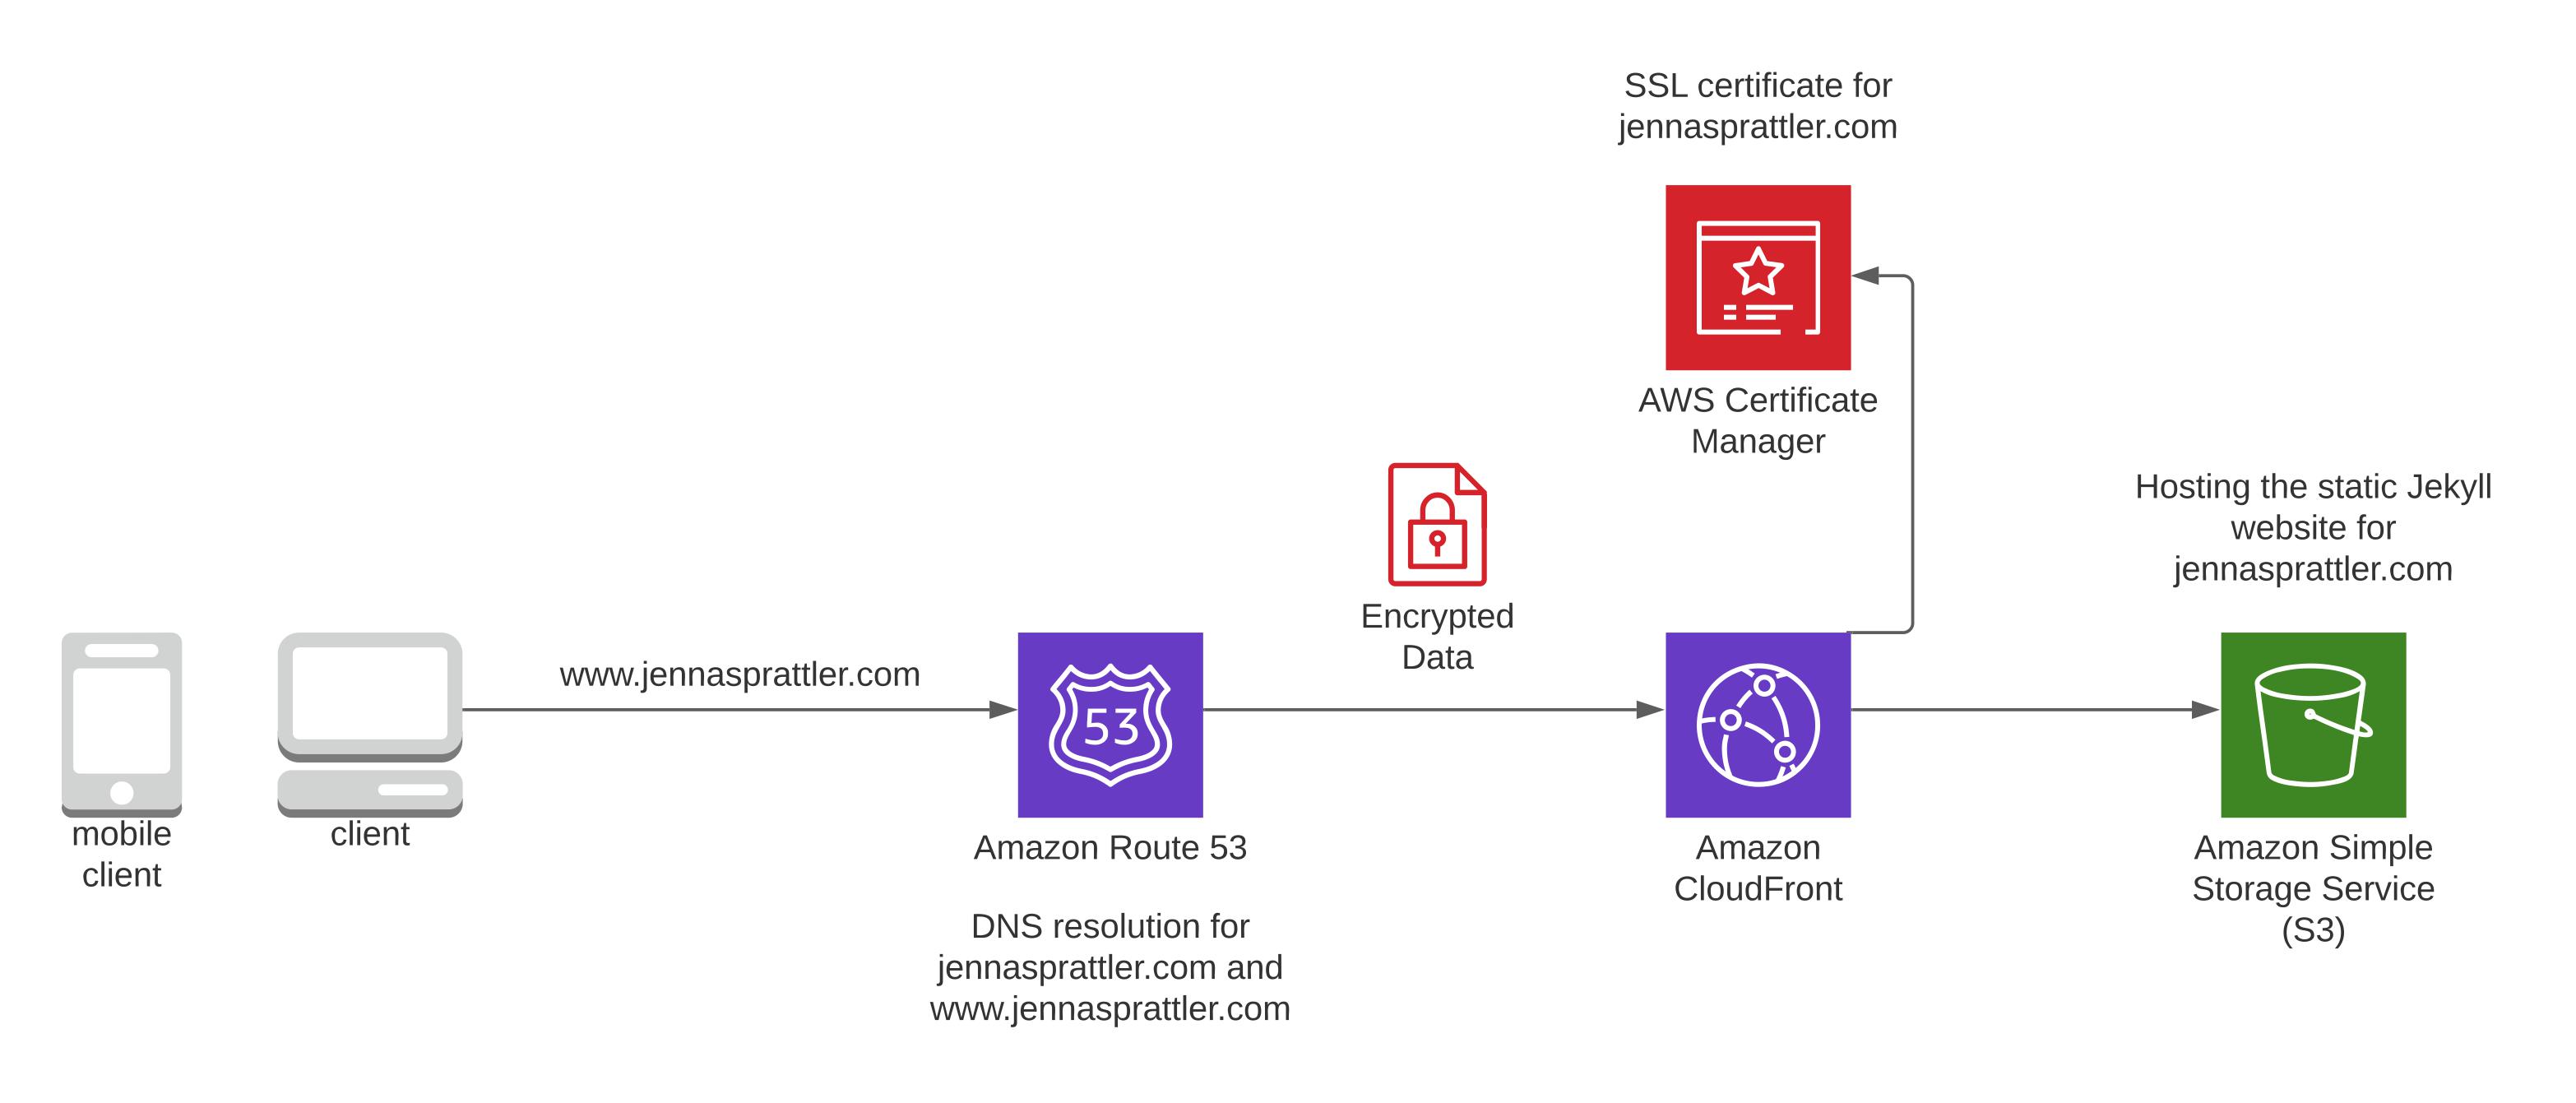
Mobile and Desktop browsers are supported by the Jekyll website
AWS Route 53 performs DNS resolution for jennasprattler.com and www.jennasprattler.com
AWS CloudFront CDN serves up any cached content of your website from one of its Edge Locations closest to you
AWS Certificate Manager hosts the SSL Certificate for your website which gets assigned to your CloudFront CDN encrypting all user traffic
AWS S3 Bucket hosts all of your website files whereas the CloudFront CDN retrieves anything that it doesn't have cached on its Edge Location
High-level Overview - CI/CD Flow
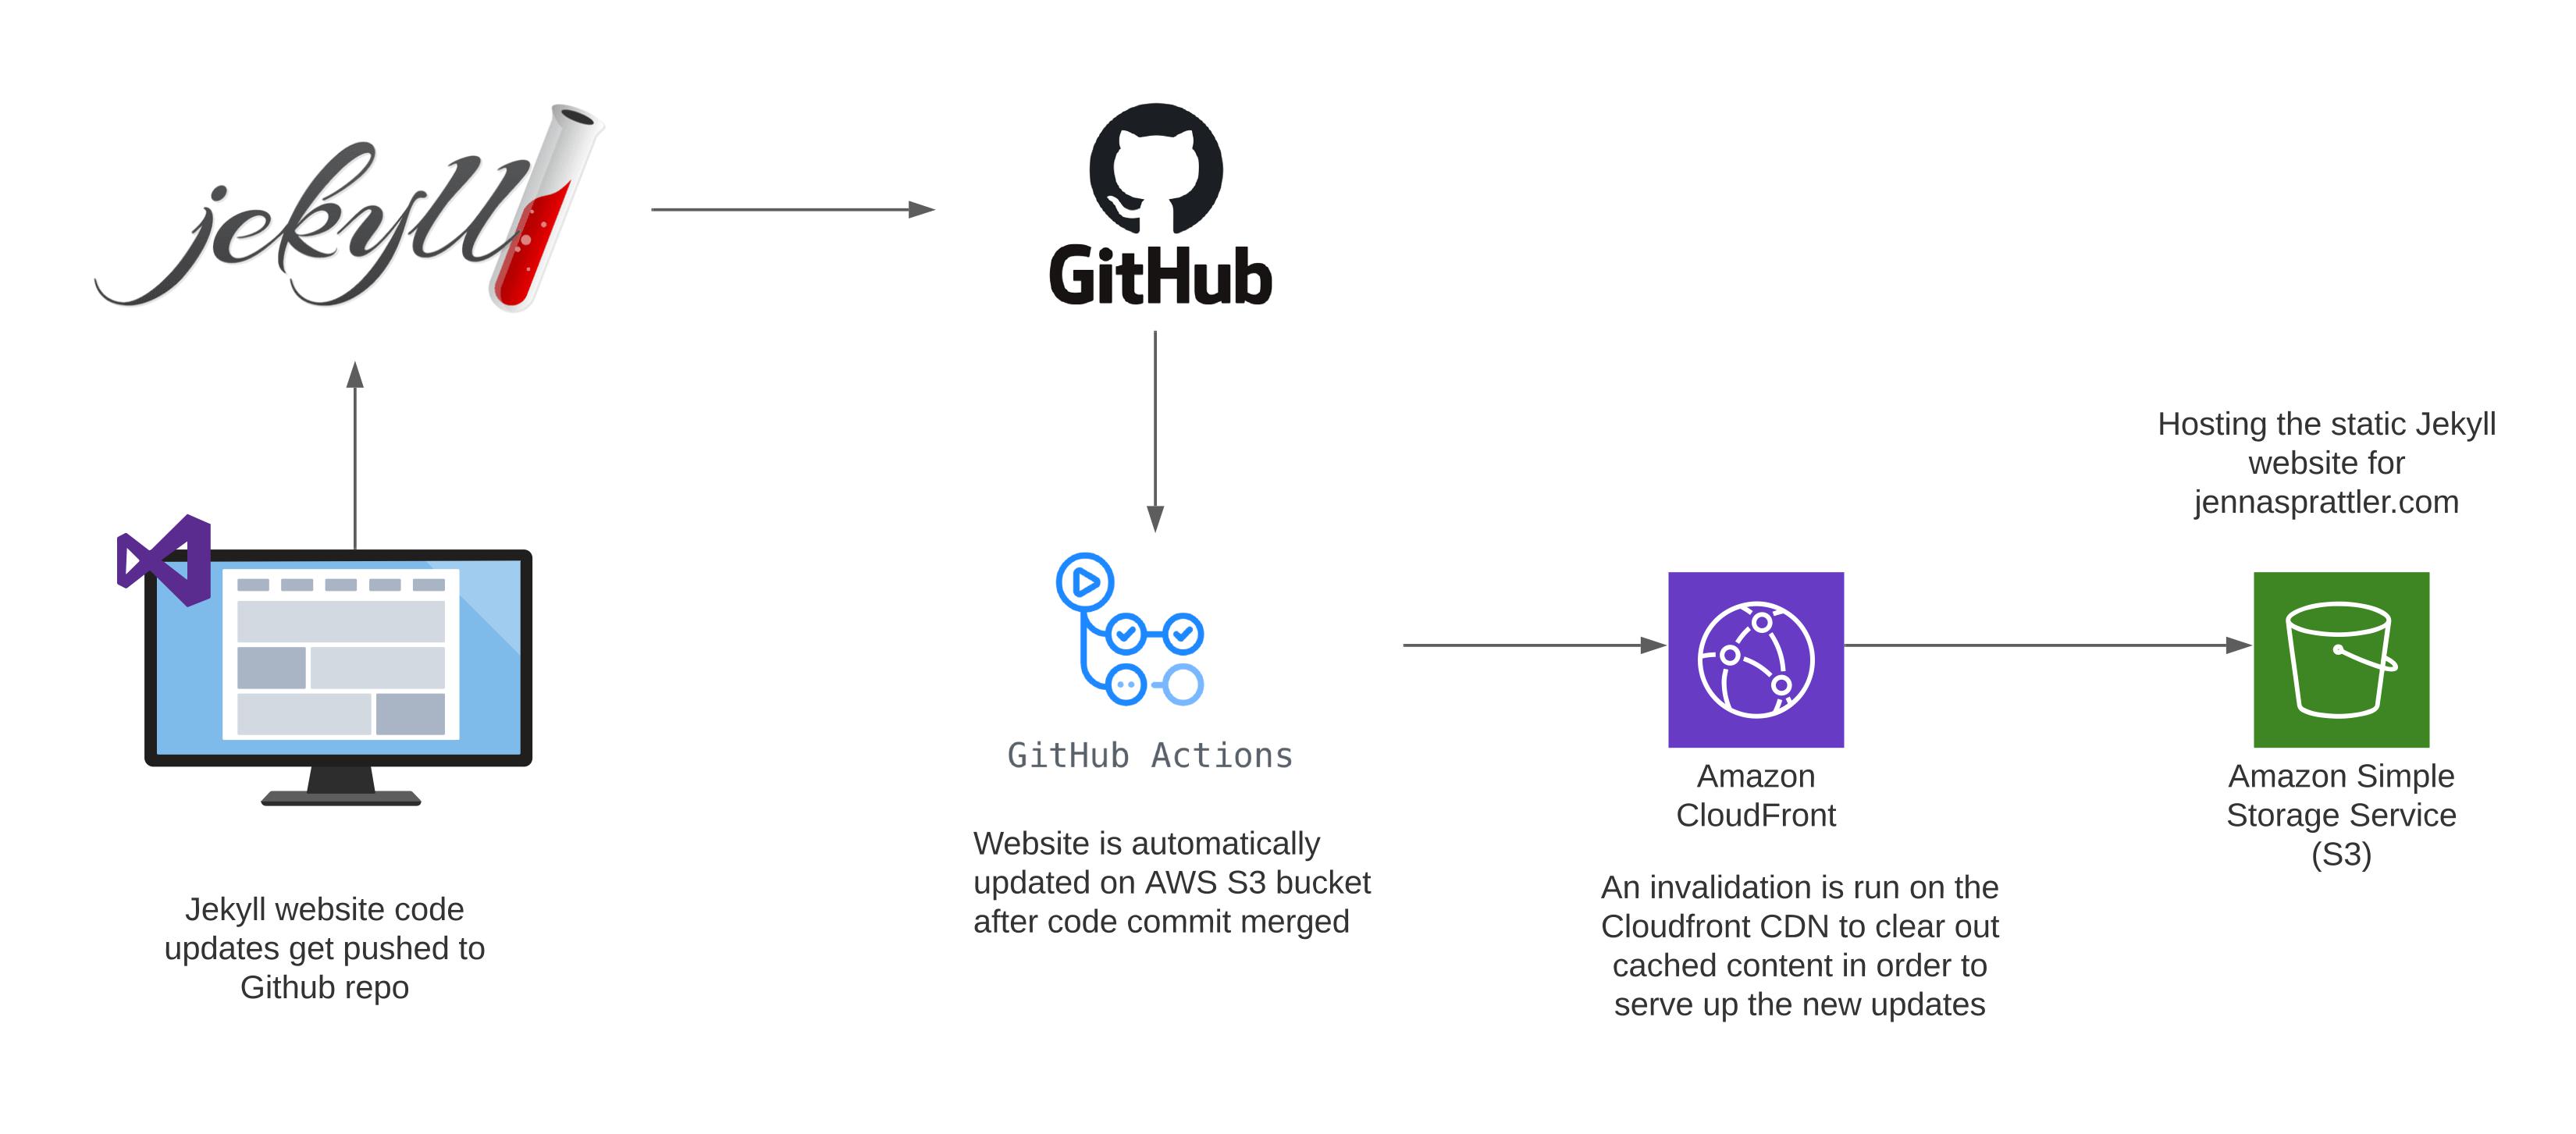
Developer writes the code for the Jekyll Website
GitHub hosts the repo for the Jekyll website files
GitHub Actions kickoff the CI/CD Workflow whenever a push is made to the main branch
CI/CD Workflow uploads the output files from the Jekyll
_sitedirectory to the AWS S3 bucketCloudFront invalidation is run to clear out any cached content and immediately serve the updated S3 website content
Procedure
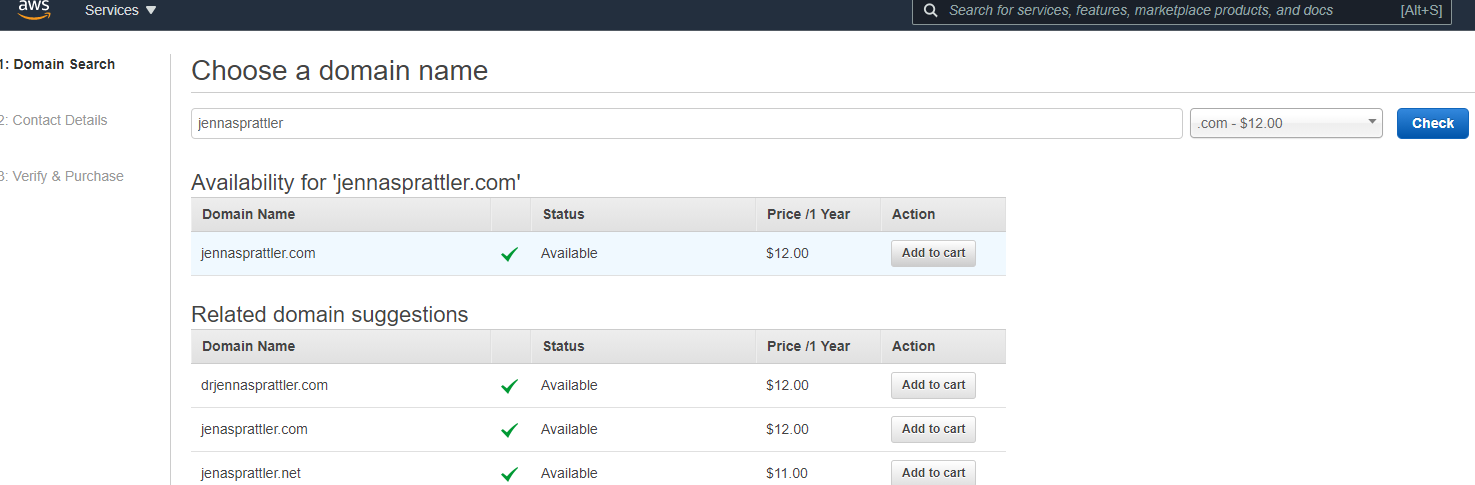
Create Route 53 Domain
- I'll be creating my domain using Route 53 however, you can use another domain provider if you like just note that you'll need to follow a slightly different procedure than what I've defined in this runbook.
Navigate to the AWS Route 53 service and check the availability of your domain name - if available purchase it. At the time of this writing, it cost me $12 per year for my new .com domain.
Your new domain should now show a status of "Domain registration in progress." It will take approximately 30 minutes for your new domain to be registered.
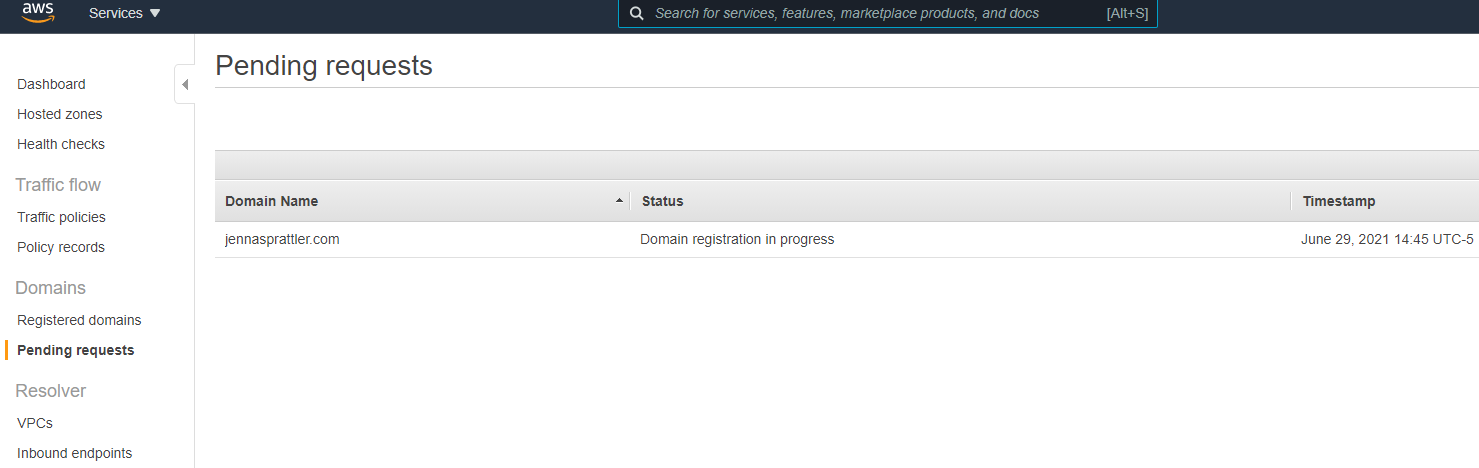
Proceed with the next section to create the S3 bucket. We'll create DNS records for our new site in a later section.
Create S3 Bucket
Copy the Cloudformation stack YAML code below and replace all FIXME values per your environment.
BucketNamemust match your domain name exactlyPublicAccessBlockConfigurationproperties are all set to false to allow public access to your websiteBucketPolicyhass3:GetObjectaction set to allow anyone can read the object data and view the websiteWebsiteConfigurationenables the static website capability in S3WWWBucketcreates an empty bucket only used to redirect www.FIXME.com traffic to your FIXME.com bucket; only needed if you decide to not use a CloudFront CDN and just host unencrypted content from S3 only (which is what I did initially)
    ---
    AWSTemplateFormatVersion: '2010-09-09'


    Description: Simple S3 Bucket to host static public website.


    Resources:


      S3Bucket:
        Type: AWS::S3::Bucket
        Properties:
          BucketName: FIXME.com
          PublicAccessBlockConfiguration:
            BlockPublicAcls: false
            BlockPublicPolicy: false
            IgnorePublicAcls: false
            RestrictPublicBuckets: false
          Tags:
            -
              Key: Description
              Value: FIXME
            - Key: Project
              Value: FIXME.com
          VersioningConfiguration:
            Status: Enabled
          WebsiteConfiguration:
            ErrorDocument: 404.html
            IndexDocument: index.html

      BucketPolicyDataSync:
        Type: 'AWS::S3::BucketPolicy'
        Properties:
          Bucket:  !Ref S3Bucket
          PolicyDocument:
            Statement:
            -
              Sid: "AllowAccesToIAMRole"
              Action:
                - "s3:GetObject"

              Effect: "Allow"
              Resource:
                Fn::Join:
                  - ""
                  -
                    - "arn:aws:s3:::"
                    -
                      Ref: "S3Bucket"
                    - "/*"
              Principal: "*"

      WWWBucket:
        Type: AWS::S3::Bucket
        Properties:
          BucketName: www.FIXME.com
          AccessControl: BucketOwnerFullControl
          WebsiteConfiguration:
            RedirectAllRequestsTo:
              HostName: FIXME.com

    Outputs:


      S3BucketName:
        Value: !Ref S3Bucket
        Description: S3 Bucket for object storage


      S3BucketARN:
        Value: !GetAtt S3Bucket.Arn
        Description: S3 bucket ARN
Navigate to the region closest to you and go to the CloudFormation service.
Upload your updated CFT stack to create your new S3 buckets for hosting your static website files and monitor the event progress.
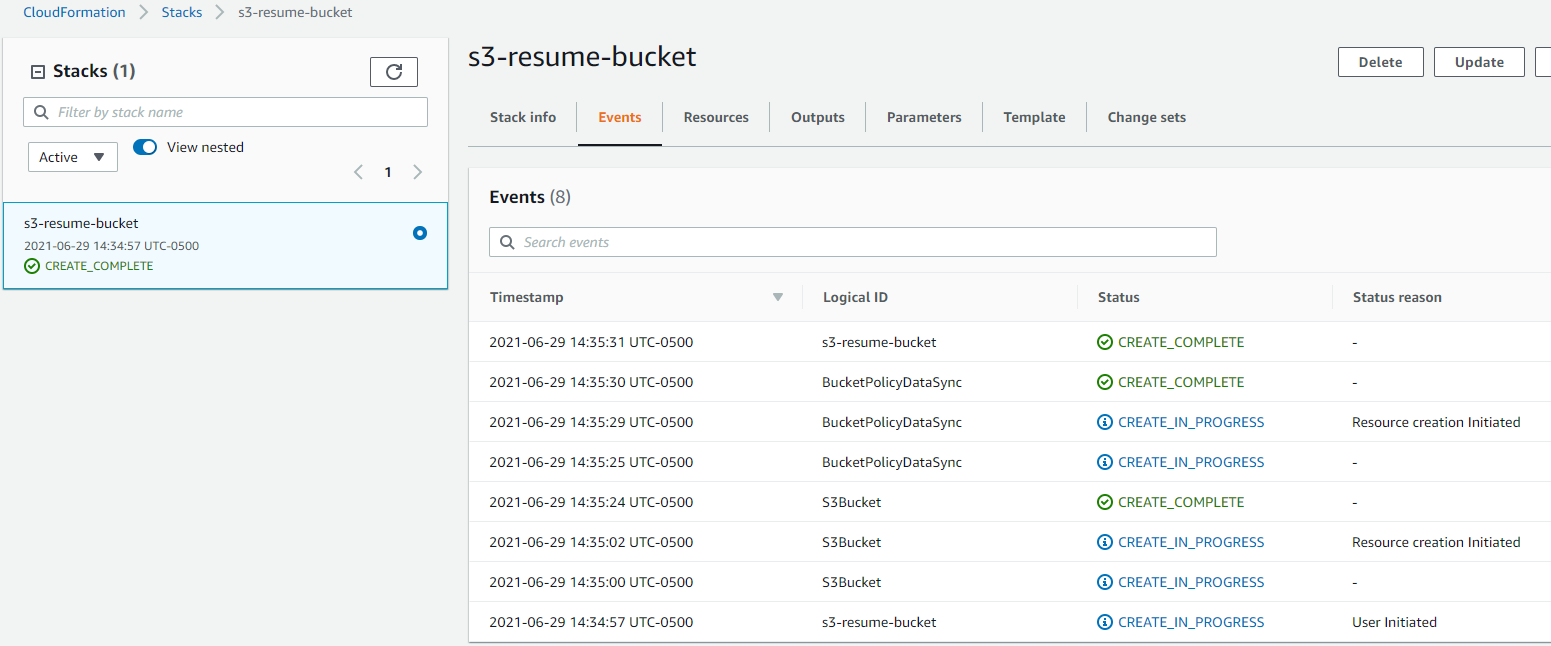
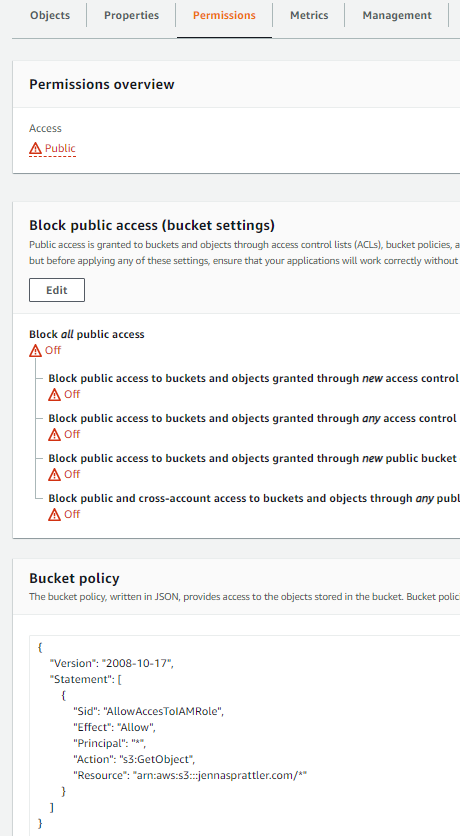
Once created, your S3 bucket permissions and policy should look similar to this:
Capture your S3 Endpoint URL - you can find this by navigating to your new S3 Bucket > Properties > Static web site hosting > Endpoint. We'll need this for the CloudFront section.
Create Route 53 Hosted Zone and DNS Records
- Proceed once the Domain registration has been completed
Navigate to the Route 53 service where you should see your new domain has moved from Pending requests to Registered domains.
Create a Hosted zone for your new domain by entering your Domain Name and selecting Public Hosted Zone in the Type dropdown.
The NS and SOA records for your new domain will auto-create for you.
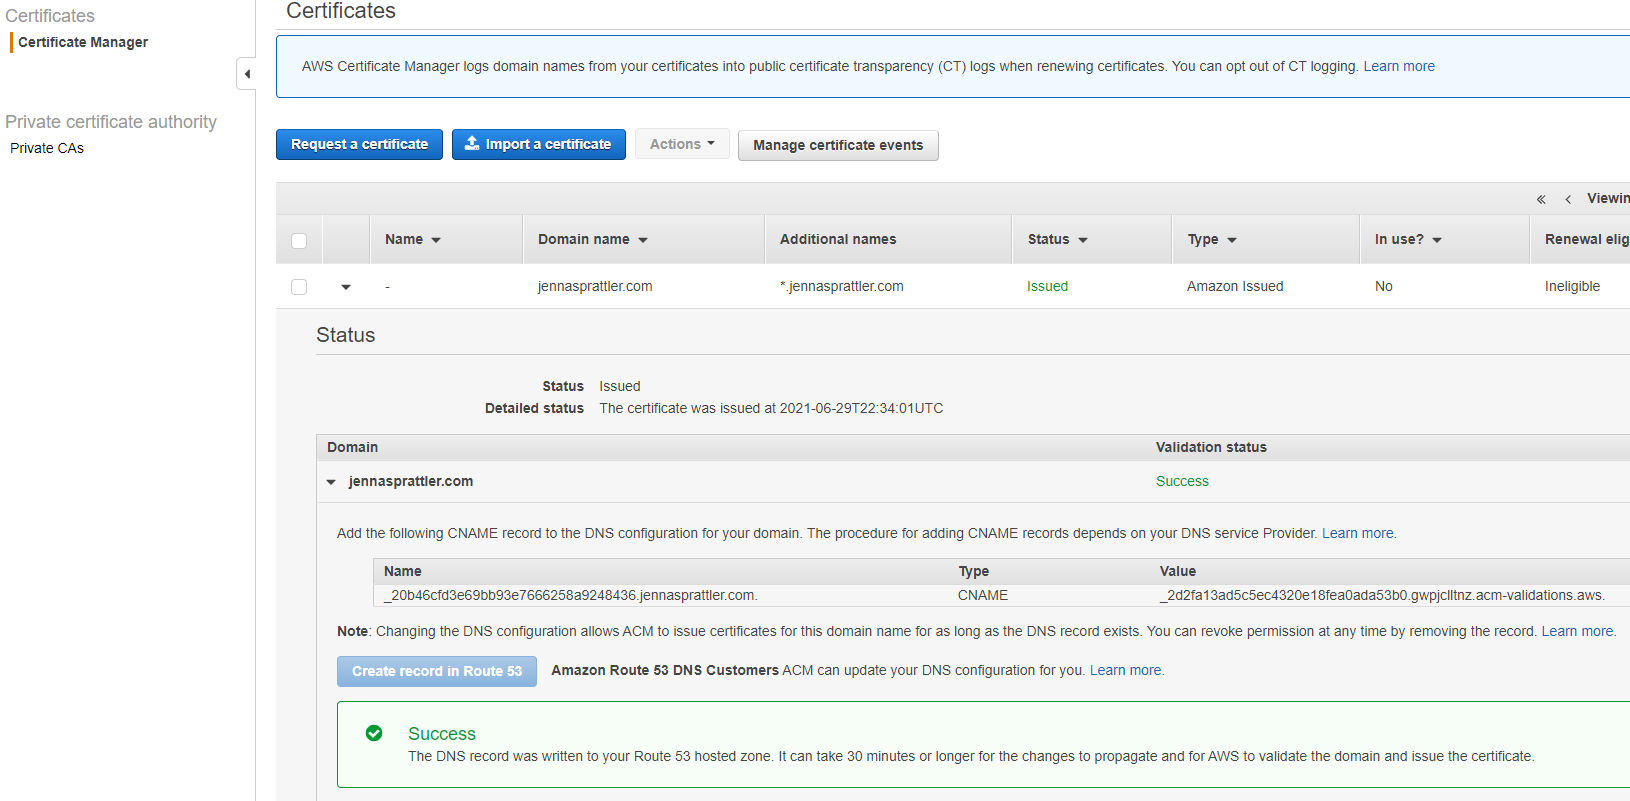
Proceed to the next section to create your new CloudFront distribution as you'll need to point your new A records to the new CloudFront Domain Name for your website. You can also go through the ACM certificate process to automatically validate your new domain which will automatically create a new CNAME record for you in your hosted zone. Once that's completed, return here to step 5.
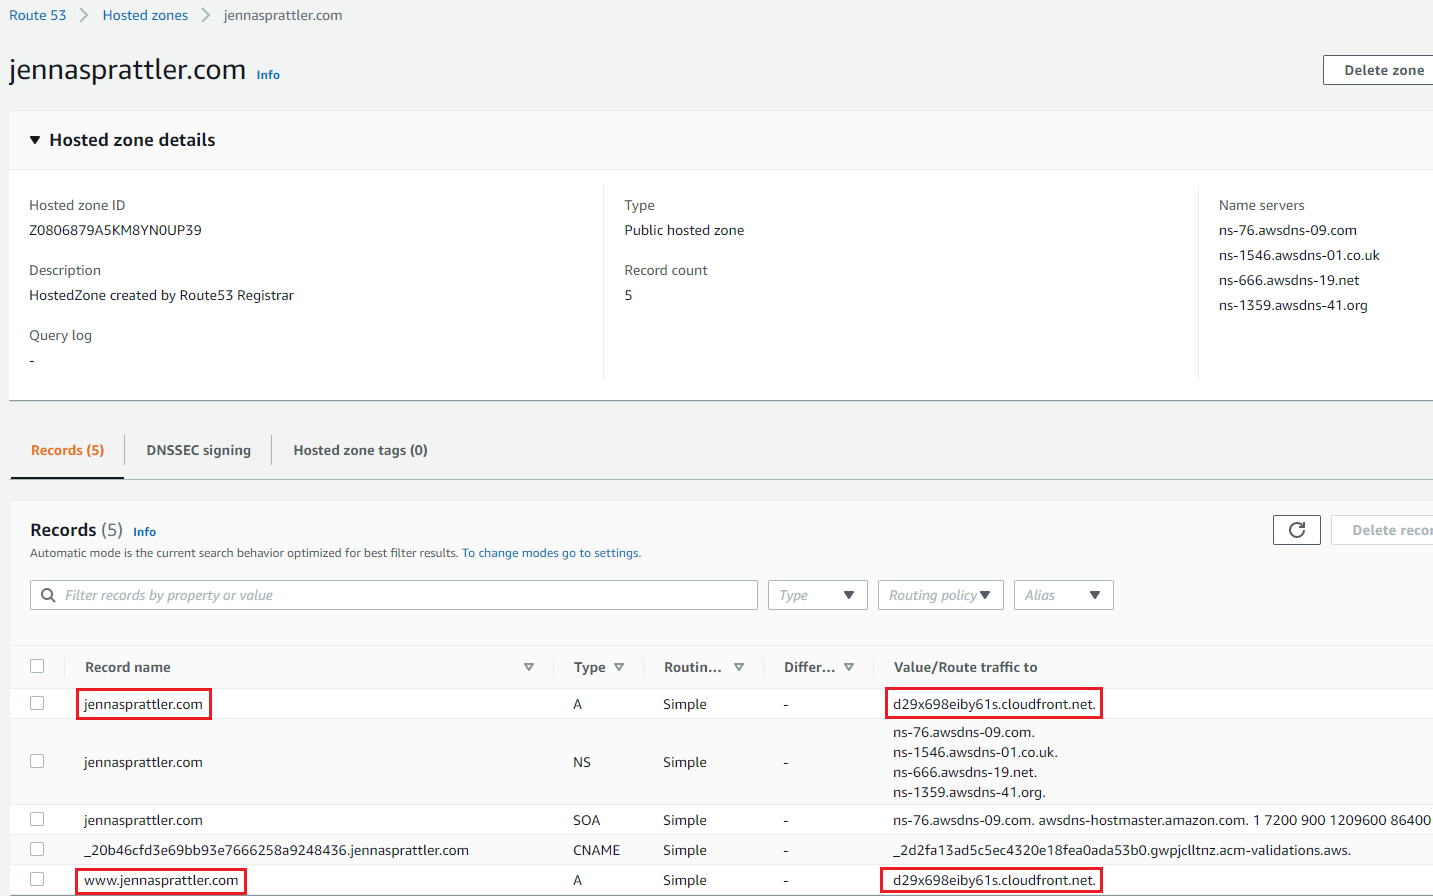
In your new public hosted zone, you should now see a CNAME record pointing to your ACM Certificate in addition to the NS and SOA records.
Create 2 new A records, one for your root domain and the other for any sub-domains you want pointed to your root domain (ie www.FIXME.com). Each A record should point to your new CloudFront Domain Name created in the Create CloudFront Distribution section.
Create CloudFront Distribution
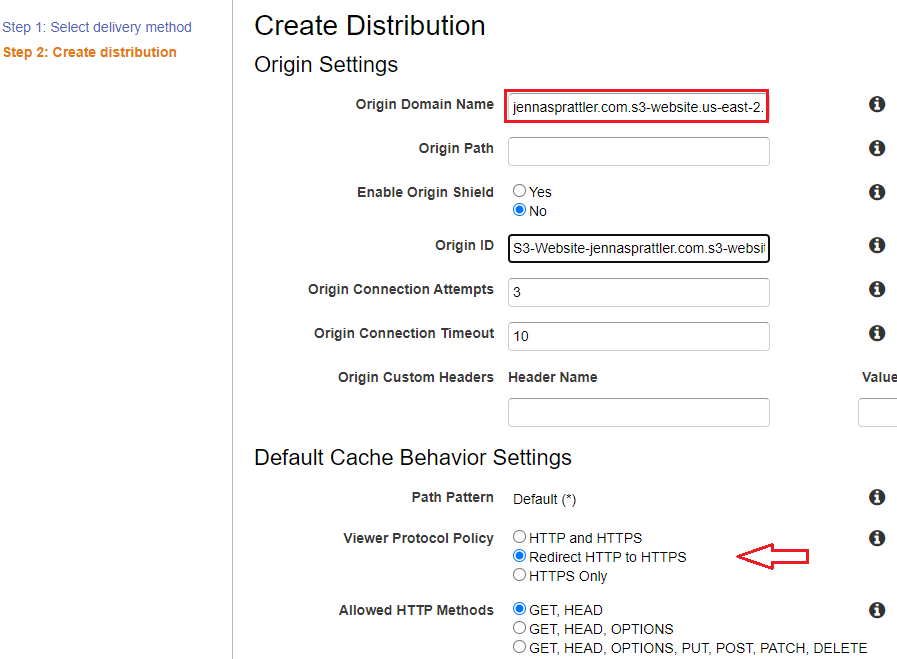
Navigate to the AWS Cloudfront service and select Create distribution > Web > Get started
Under Origin Domain name, paste your S3 Endpoint and remove the prefix, "http://" from the URL. Under Default Cache Behavior Settings > Viewer Protocol Policy select "Redirect HTTP to HTTPS". Leave the remaining Origin settings as default.
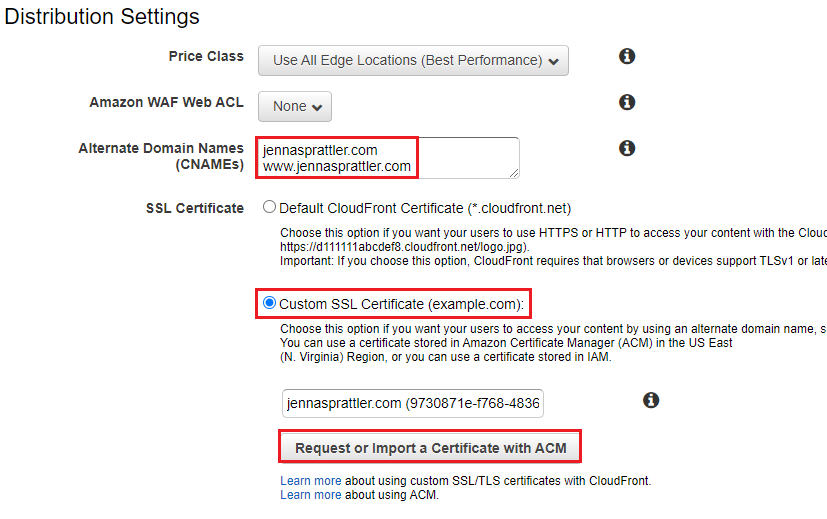
Under Distribution Settings > Alternate Domain Names (CNAMEs):
Enter your new domain and any other subdomains (ie www.FIXME.com) you plan to use each on a new line.
Select "Custom SSL Certificate" to secure your website using a stored in Amazon Certificate Manager (ACM) in the US East (N. Virginia) Region. Select the "Request or Import a Certificate with ACM button" which will take you through the process of validating your domain. I went through the DNS validation process since my domain was registered using Route 53.
- NOTE: Your Route 53 domain must have completed registration before you can request to validate it with a new ACM cert. It can take 30+ minutes for your SSL cert to be validated, meanwhile, you can move onto the IAM policy/user creation steps below. Don’t forget to request your ACM cert from us-east-1 which is the only region supported by Cloudfront!
For the Default Root Object, enter:
index.htmlOnce your new CDN has been created, copy the 14-character alphanumeric Cloudfront ID and Domain Name (ie FIXME.cloudfront.net).
Create IAM Policy and IAM User for Github Actions
Navigate to IAM and create a new IAM Policy using the JSON editor.
Paste the following policy contents into the JSON editor and update all "FIXME" values for your bucket name, AWS account ID and CloudFront ID:
    {
        "Version": "2012-10-17",
        "Statement": [
            {
                "Resource": [
                    "arn:aws:s3:::FIXME-bucket-name",
                    "arn:aws:s3:::FIXME-bucket-name/*"
                ],
                "Sid": "VisualEditor1",
                "Effect": "Allow",
                "Action": [
                    "s3:*"
                ]
            },
            {
                "Sid": "VisualEditor2",
                "Effect": "Allow",
                "Action": "cloudfront:*",
                "Resource": "arn:aws:cloudfront::FIXME-aws-account-number:distribution/FIXME-distribution-id"
            }
        ]
    }
Create a new IAM User with programmatic access and attach the IAM Policy you just created above.
Copy the AWS access key ID and Secret access key for your user to a safe location such as secrets manager or key vault, as these will be used in the GitHub Action Workflow setup below.
Create GitHub Action Workflow
From within your GitHub repo navigate to:
.github/workflows/and create a new file calledbuild-and-deploy.ymlCopy and paste the following into your newly created GitHub Action workflow and update the FIXME value for the region that your S3 bucked was deployed in.
name: CI / CD

# Controls when the action will run.
on:
  # Triggers the workflow on push for the main branch
  push:
    branches: [ main ]

  # Allows you to run this workflow manually from the Actions tab
  workflow_dispatch:

env:
  AWS_ACCESS_KEY_ID: $
  AWS_SECRET_ACCESS_KEY: $
  AWS_DEFAULT_REGION: 'FIXME'

# A workflow run is made up of one or more jobs that can run sequentially or in parallel
jobs:
  build:
    runs-on: ubuntu-latest
    steps:
    - uses: actions/checkout@v2
    - name: Set up Ruby
      uses: ruby/setup-ruby@v1
      with:
        ruby-version: 2.7
        bundler-cache: true
    - uses: actions/cache@v2
      with:
        path: vendor/bundle
        key: $-gems-$
        restore-keys: |
          $-gems-
    - name: Install dependencies
      run: |
        gem install bundler
        gem install jekyll
        bundle config path vendor/bundle
        bundle install --jobs 4 --retry 3
    - name: "Build Site"
      run: bundle exec jekyll build
      env:
        JEKYLL_PAT: $
    - name: "Deploy to AWS S3"
      run: aws s3 sync ./_site/ s3://$ --acl public-read --delete --cache-control max-age=604800
    - name: "Create AWS Cloudfront Invalidation"
      run: aws cloudfront create-invalidation --distribution-id $ --paths "/*"
Create GitHub Action Secrets
Navigate to Your Repo > Settings > Secrets > Actions
Configure The GitHub Action Secrets for the following:
AWS_ACCESS_KEY_ID- The AWS access key ID associated with the programmatic IAM User.AWS_SECRET_ACCESS_KEY- The AWS secret key ID associated with the programmatic IAM User.AWS_S3_BUCKET_NAME- Your AWS bucket name hosting your website, for example jennasprattler.com or FIXME.comAWS_CLOUDFRONT_DISTRIBUTION_ID- The 14-character alphanumeric Cloudfront distribution ID fronting your S3 bucket's website.JEKYLL_PAT- Set up a GitHub token that can be used by the workflow to build the Jekyll _site pages.
Deploy your Jekyll website using GitHub Actions
Make a change to your Jekyll site > commit > push the changes to main.
Navigate to Your Repo > Actions and under the CI / CD Workflow select the latest running build to monitor the progress:
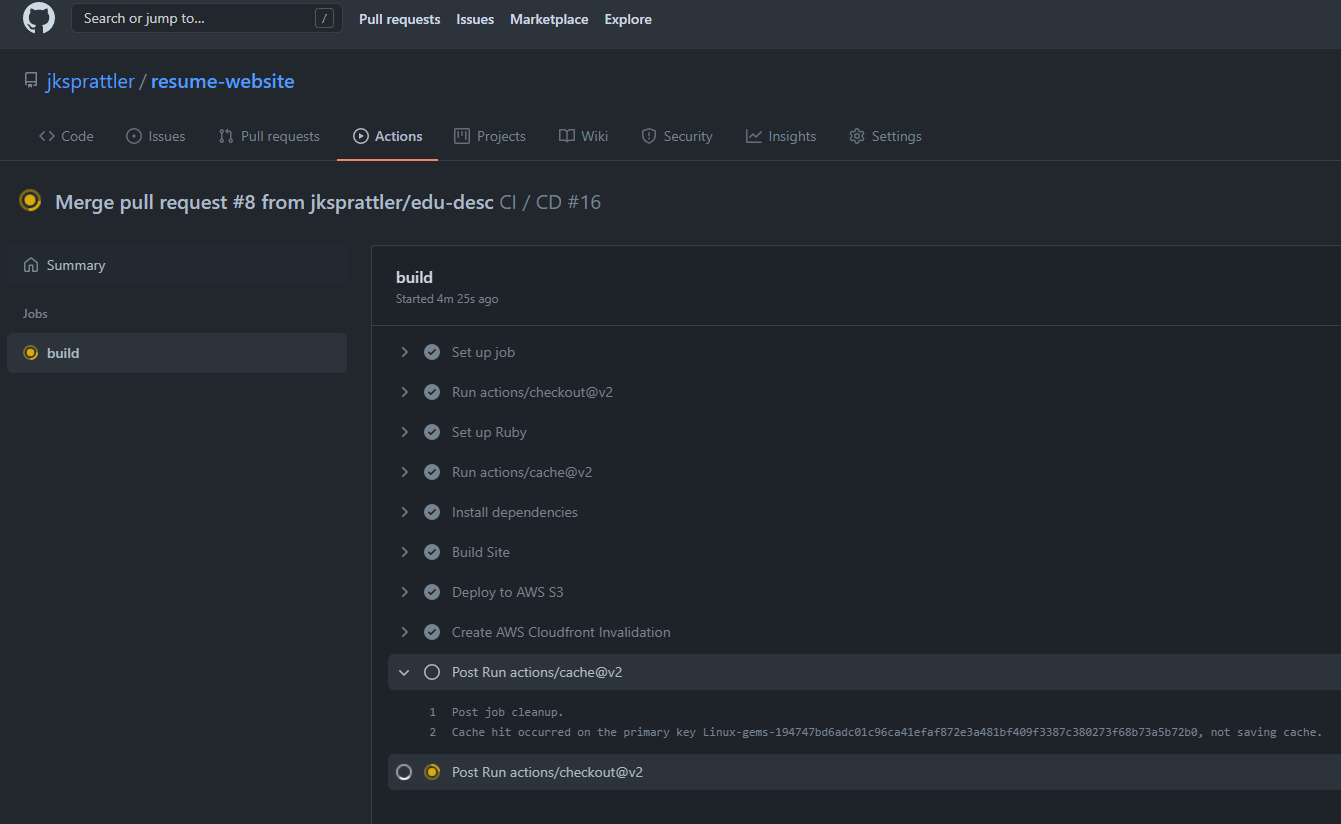
Once the Workflow has completed, browse to your website in a new tab or refresh any open tabs to see the updated content.
You now have a functioning, secure, serverless, static website configured for automatic updates upon code commit to your repository!